Clawdbot - Your Personal AI Assistant 2026 Setup Guide
Your phone buzzes. It's 8 AM, and your AI assistant has already checked your calendar, read your emails, and sent you a morning briefing through WhatsApp. While you slept, it monitored your home automation system and adjusted the thermostat. This isn't science fiction; it's what Clawdbot makes possible today.
Clawdbot is an open-source AI assistant platform created by Peter Steinberger that connects your choice of AI models (Claude, OpenAI, Gemini, or any LLM provider) to your favorite messaging apps. Unlike ChatGPT or other AI assistants trapped in their own apps, Clawdbot lives where you already chat: WhatsApp, Telegram, Discord, or iMessage.
What Clawdbot Can Do For You
Clawdbot transforms how you interact with AI by bringing powerful automation to your messaging apps:
Daily Automation
- Email management: read, search, and compose messages
- Calendar control: check availability and schedule meetings
- Home automation: control lights, switches, and smart devices through natural language
- Voice transcription: convert voice notes to text and respond intelligently
Advanced Capabilities
- Browser automation: fill forms, scrape data, take screenshots
- Scheduled tasks: set up recurring workflows and daily briefings
- Custom skills: extend functionality with 50+ built-in modules
- Multi-platform: use the same assistant across all your messaging apps
The real power comes from running Clawdbot 24/7 on your own server. This guide shows you how to deploy it on a Hetzner VPS with secure remote access.
Why Self-Host on a VPS?
Clawdbot needs to run continuously to be proactive. A VPS provides:
- Always-on availability for scheduled tasks and notifications
- Better performance than running on your laptop
- Remote access from anywhere in the world
- Cost-effective hosting starting at $5 per month
- Full control over your data and privacy
Prerequisites
Before starting, you need:
- A Hetzner account (or any VPS provider)
- An API key for your preferred LLM provider (Anthropic Claude, OpenAI, Google Gemini, or others)
- A messaging account: WhatsApp, Telegram, or Discord
- Basic command line knowledge
- 30 minutes for setup
Setting Up Your Hetzner VPS
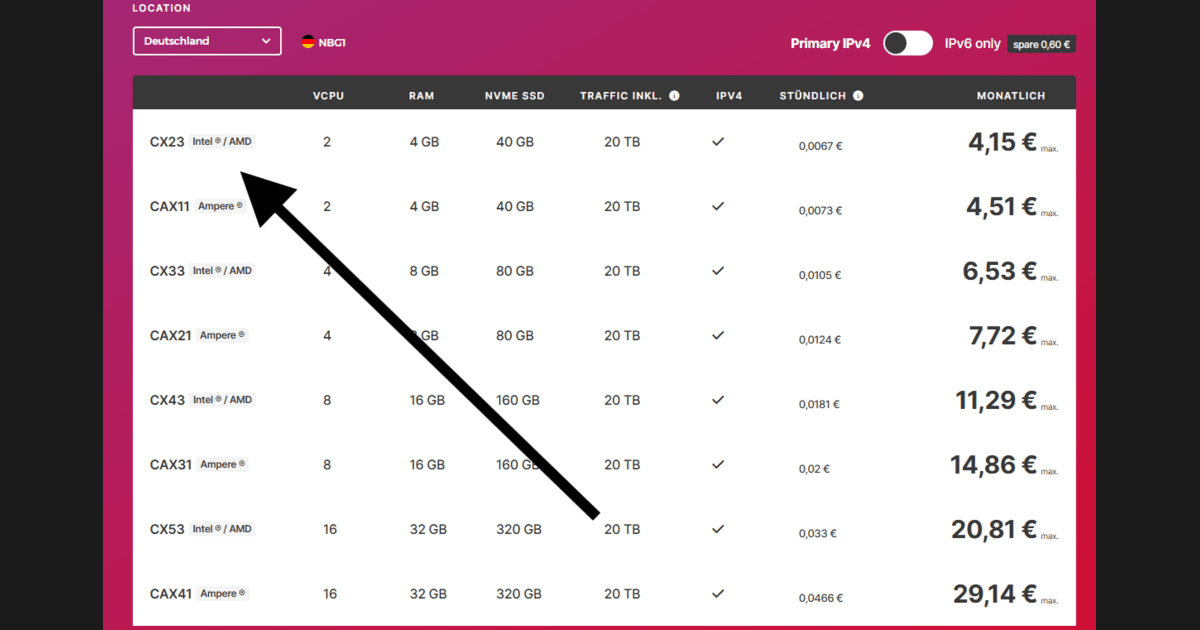
Hetzner offers reliable and affordable VPS hosting perfect for Clawdbot. A basic server with 4GB RAM costs around $5 monthly and handles Clawdbot with room to spare.
Create Your Server
Log in to Hetzner Cloud Console and create a new project:
- Click "Add Server"
- Choose a location close to you for better latency
- Select Ubuntu 24.04 as your operating system
- Pick the CX22 plan (4GB RAM, 2 vCPUs)
- Add your SSH key for secure access
- Name your server (e.g., "clawdbot-server")
- Click "Create & Buy Now"
Wait 1-2 minutes for your server to provision. Copy the IP address from the dashboard.
Initial Server Setup
Connect to your server via SSH:
ssh root@your-server-ip
Create a dedicated user for security (never run services as root):
adduser clawdbot
usermod -aG sudo clawdbot
su - clawdbot
Update your system packages:
sudo apt update && sudo apt upgrade -y
Install Node.js and Dependencies
Clawdbot requires Node.js 22 or higher. Install it using the official repository:
curl -fsSL https://deb.nodesource.com/setup_22.x | sudo -E bash -
sudo apt install -y nodejs
Verify the installation:
node --version
npm --version
Install pnpm, the package manager Clawdbot uses:
npm install -g pnpm
Securing Your VPS with Tailscale
Opening your Clawdbot dashboard to the internet is risky. Tailscale creates a secure private network, letting you access your server safely from anywhere without exposing ports.
Install Tailscale
Add the Tailscale repository:
curl -fsSL https://pkgs.tailscale.com/stable/ubuntu/jammy.noarmor.gpg | sudo tee /usr/share/keyrings/tailscale-archive-keyring.gpg >/dev/null
curl -fsSL https://pkgs.tailscale.com/stable/ubuntu/jammy.tailscale-list | sudo tee /etc/apt/sources.list.d/tailscale.list
Install and start Tailscale:
sudo apt update
sudo apt install -y tailscale
sudo tailscale up
This displays an authentication URL. Open it in your browser and log in with your Tailscale account (create one at tailscale.com if needed).
Configure Tailscale for Clawdbot
Once authenticated, your server joins your private Tailscale network. Find your Tailscale IP:
tailscale ip -4
Save this IP (it starts with 100.x.x.x). You'll use it to access Clawdbot's dashboard securely.
Installing Clawdbot
Now the fun part: getting Clawdbot running.
Install Clawdbot CLI
Install the global package:
npm install -g clawdbot@latest
Verify it's working:
clawdbot --version
Run the Onboarding Wizard
The interactive wizard handles most configuration:
clawdbot onboard --install-daemon
The wizard asks several questions:
Gateway Mode: Choose "local" for VPS deployment
Authentication: Choose your preferred AI provider and provide your API key:
Copy the token and paste it when the wizard asks. For other providers, OAuth is also an option.
Messaging Providers: Select which services to connect:
- WhatsApp: displays a QR code to scan
- Telegram: requires a bot token from @BotFather
- Discord: needs a bot token from Discord Developer Portal
Daemon Installation: Say yes to install Clawdbot as a system service. This ensures it runs automatically on boot.
Start the Service
Check if the daemon is running:
clawdbot daemon status
View logs to confirm everything works:
clawdbot daemon logs
You should see output indicating the gateway started successfully.
Access the Dashboard
Open your browser and navigate to:
http://your-tailscale-ip:18789
Replace your-tailscale-ip with the Tailscale address from earlier (100.x.x.x). You'll see the Clawdbot dashboard showing your connected providers and active sessions.
Connecting Your Messaging Apps
WhatsApp Setup
By default, Clawdbot only activates self-chat mode for security. This means you need to find yourself in your WhatsApp contacts list to chat with your assistant. Open WhatsApp, search for your own number in contacts, and start messaging yourself.
clawdbot providers login
Scan the QR code with WhatsApp (Settings → Linked Devices).
Telegram Setup
Telegram offers proper bot accounts, making it the recommended option:
- Open Telegram and message @BotFather
- Send
/newbotand follow the prompts - Copy the bot token BotFather provides
- Run
clawdbot configureand add your token - Start a chat with your bot and send a test message
Test Your Connection
Send a message to your bot: "Hello, are you there?"
You should get a response from Clawdbot within seconds. Congratulations, your AI assistant is live!
Configuring Access Control
Lock down who can use your assistant. Edit the configuration:
nano ~/.clawdbot/clawdbot.json
Add allowlists for each provider:
{
  "whatsapp": {
    "allowFrom": ["+1234567890"]
  },
  "telegram": {
    "allowFrom": ["your_telegram_user_id"]
  }
}
Find your Telegram user ID by sending /start to @userinfobot.
Restart the daemon to apply changes:
clawdbot daemon restart
Customizing Your Assistant
Edit Agent Personality
Your agent's behavior is defined in ~/clawd/AGENTS.md:
nano ~/clawd/AGENTS.md
Customize it to match your needs:
# Your Personal Assistant

You are a helpful, efficient personal assistant. Your primary goals:

- Keep responses concise and actionable
- Always ask before sending emails or making posts
- Provide morning briefings at 8 AM with calendar and email summaries
- Monitor my smart home and alert me to unusual activity

## Preferred Style

- Use bullet points for lists
- Include relevant links when researching topics
- Summarize long emails in 2-3 sentences
Add Custom Skills
Create a custom skill by adding a folder to ~/clawd/skills/:
mkdir -p ~/clawd/skills/github-notifier
nano ~/clawd/skills/github-notifier/SKILL.md
Add your skill definition:
---
id: github-notifier
name: GitHub Notification Manager
description: Monitor GitHub repositories and send notifications
---

# GitHub Notifier Skill

When the user asks to monitor GitHub activity:

1. Use the GitHub API at ${GITHUB_API}
2. Authenticate with token ${GITHUB_TOKEN}
3. Check for new issues, PRs, and mentions
4. Send notifications through messaging apps
5. Provide daily summaries of repository activity
Enable your custom skill:
clawdbot skills enable github-notifier
clawdbot daemon restart
Maintenance and Monitoring
Check System Health
Run the diagnostic tool regularly:
clawdbot doctor
This auto-fixes common issues like stale locks, permission problems, and configuration errors.
Monitor Logs
Watch real-time logs:
clawdbot daemon logs -f
Look for errors or warnings that indicate problems.
Update Clawdbot
Keep your installation current:
clawdbot update
This downloads the latest version and restarts the daemon.
Backup Your Configuration
Back up your workspace and credentials:
tar -czf clawdbot-backup-$(date +%Y%m%d).tar.gz ~/.clawdbot ~/clawd
Store backups securely off-server.
Troubleshooting Common Issues
Gateway Won't Start
Run the diagnostic tool:
clawdbot doctor
Check if another process is using port 18789:
sudo lsof -i :18789
Can't Access Dashboard via Tailscale
Verify Tailscale is running:
sudo tailscale status
Confirm the gateway binds to the right interface:
clawdbot configure
Make sure gateway mode is set to "local" or "tailnet".
WhatsApp QR Code Won't Scan
QR codes expire after 60 seconds. Generate a fresh one:
clawdbot providers login
Ensure you're scanning with the correct phone (the dedicated number, not your personal device).
Bot Not Responding to Messages
Check if the daemon is running:
clawdbot daemon status
View recent logs for errors:
clawdbot daemon logs | tail -n 50
Verify your allowlist includes your phone number or user ID:
cat ~/.clawdbot/clawdbot.json | grep allowFrom
High Memory Usage
The browser skill consumes resources. Disable it if not needed:
nano ~/.clawdbot/clawdbot.json
Set browser to disabled:
{
  "browser": {
    "enabled": false
  }
}
Restart the daemon:
clawdbot daemon restart
Next Steps
You now have a fully functional AI assistant running 24/7 on your own infrastructure. Here's what to explore next:
Enhance Capabilities
- Install the Home Assistant skill to control smart home devices
- Enable calendar and email skills for productivity automation
- Set up scheduled tasks for daily briefings and reminders
Improve Security
- Configure stricter allowlists in your configuration
- Set up automated backups to cloud storage
- Enable Tailscale SSH for secure server access
Customize Behavior
- Refine your agent's personality in AGENTS.md
- Add long-term facts to MEMORY.md
- Create custom skills for your specific workflows
Join the Community
- Connect with other users on Discord
- Share your custom skills and automations
- Follow @steipete for updates
Frequently Asked Questions
How much does running Clawdbot cost?
Running costs include your VPS (around $5/month for Hetzner) plus your preferred AI provider. Typical usage ranges from $25-100/month depending on how much you chat with your assistant.
Is my data private and secure?
Completely. Everything runs on your own server, and messages only go to your chosen AI provider. Using Tailscale ensures your dashboard and API remain private. Your conversations never touch Clawdbot's servers because there aren't any.
Can I run multiple bots for different purposes?
Yes. Run multiple Clawdbot instances with different configurations on different ports. Each can have unique skills, providers, and agent personalities.
What happens if my VPS goes down?
Your assistant stops responding until the server restarts. Set up monitoring with UptimeRobot or similar services to alert you if the server becomes unreachable.